SPC flooring Installation Instructions
ATTENTION – INSTALLER/OWNER RESPONSIBILITY Inspect “all” materials carefully before installation.
All SPC floorings are manufactured in accordance with accepted industry standards. Even though our product goes through many inspections before it leaves the factory, it is the responsibility of the customer andinstaller to perform a final inspection prior to installation.
TOOLS
Basic tools and accessories: broom or vacuum, chalk line, tapping block, cleaner, hand or electric jamb saw, miter saw, moisture meter, safety glasses, straight edge, table saw, tape measure, square, utility knife, pry bar and underlayment.
JOB SITE CONDITIONS
It is the responsibility of the installer/owner to determine if the job site sub floor and job site conditions are environmentally and structurally acceptable for SPC flooring installation, and any responsibility for SPC flooring failure resulting from or connected with sub-floor, subsurface, job site damage or deficiencies after the SPC flooring has been installed.
SUB-FLOOR PREPARATION AND RECOMMENDATIONS FOR ALL INSTALLATIONS
Concrete Sub-Floors New concrete slabs require a minimum of 60 days drying time before installation. All Concrete sub-floors must be dry, smooth and free of structural defects. Hand scrape or sand with a 20 grit #3-1/2 open face paper to remove loose, flaky concrete. Make sure that the perimeter of the foundation has adequate drainage and use a vapor barrier when installing below grade.
Sub-floor Moisture Check On and below grade applications are susceptible to moisture and should be tested for moisture prior to installation in several locations within the installation area. Acceptable conditions for above, on and below grade applications are: . Less than 3 lbs. /1000 sq. ft. /24 hrs.per ASTM 1869-89 (calcium chloride test) .
Less than a reading of 5.0 on a Tramex Concrete Moisture Encounter (moisture meter). To correct any sub-floor problems concerning moisture, either wait until the sub-floor dries to meet specifications or use appropriate moisture barrier.
Sub-floors Other Than Wood or Concrete Note: Carpet and rubber tiles are unacceptable underlayments and must be removed. Terrazzo, tile and any other hard surfaces that are dry, structurally sound and level, as described above, are suitable as a sub-floor.
Radiant Heated Sub-floors Before installing over a hydronic radiant-heated floor turn off heat and wait until the floor has reached room temperature. After installing the floor return the heat to the previous setting, slowly 2o at a time.
Caution: The slab surface must never exceed 85o F. in temperature.
INTERLOCKING SPC FLOORING INSTALLATION Preparation
Remove all moldings and wall-base and undercut all door casings with a hand or power jamb saw using a scrap piece of flooring and underlayment as a guide to ensure that you undercut the door jamb to the proper height.
“Racking the Floor” As you install the floor, blend the SPC planks from several cartons to provide a random look throughout the installation. As you continue working across the floor be sure to maintain the 9” minimum stagger between end joints on all adjacent rows.
Never waste material; use the left over pieces from the cuts to start the next row or to complete a row. All flooring installations must use a underlayment.
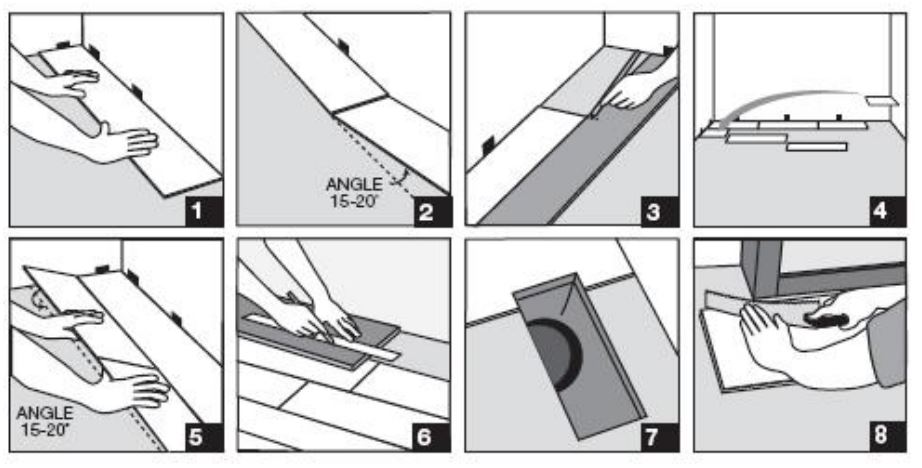
After allowing the floor to acclimate and ensuring that proper subfloor requirements are met, you can begin the installation by laying the underlayment. As you lay the first plank, use spacers to maintain the minimum 1/2” expansion gap around the perimeter of the room. Then lay the butt seams (end joints) onto each other for the first row.
The cut piece from the first row (which should be at least 9” long) will be used to start the second row. Be sure to always stagger the end seams a minimum of nine inches. To begin the second row, place the tongue of the cut piece into the groove and lock down into place. Place the second board of the second row into the groove and lock down into place. The butt seams will be held down by the following rows. The last row will be cut to fit and should be wider than two inches.
Final Touches: Install the proper trim molding at the doorways to achieve the transition and along the walls to cover the edges of any gaps along the wall due to irregularity. Remember when you are planning you installation to allow for T-molding transitions at all pass-through doorways that are less than 48"inches in width.
Installation Photos as below:

English
العربية
Français
Русский
Español
Português
Deutsch
italiano
日本語
한국어
Nederlands
Tiếng Việt
ไทย
Polski
Türkçe
አማርኛ
ພາສາລາວ
ភាសាខ្មែរ
Bahasa Melayu
ဗမာစာ
Filipino
Bahasa Indonesia
Română
Čeština
Монгол
қазақ
हिन्दी
Kiswahili
Slovenčina
українська
Ελληνικά
Suomi
Հայերեն
עברית
Latine
اردو
বাংলা
Afrikaans
සිංහල
Oʻzbekcha
latviešu
Aymara
Български
Hausa
Kurdî
Afaan Oromoo
Runasimi
Sesotho
Wikang Tagalog
isiXhosa
isiZulu


